Appearance
Institution structure
School AdminThe institution structure is the shape of your organisation. You set it up in two parts:
- Levels: what each layer is called, such as Zone, Branch, Standard and Division.
- Units: the actual zones, campuses, standards and divisions.
Everything else hangs off this tree. People's access, student placements, teaching assignments, timetables and attendance all point at a unit.
Before you start
- Your institution has been set up in SolAssists, usually with four levels already: Zone, Branch, Standard and Division. See Initial setup.
- To add, edit or delete you need the organisation permissions that the School Admin role has.
- Decide your levels before adding any units. Once units exist, what a level Behaves as is effectively locked.
Where to find it
Institution Setup → Institution Structure. The Institution structure button on the Dashboard opens the same page.
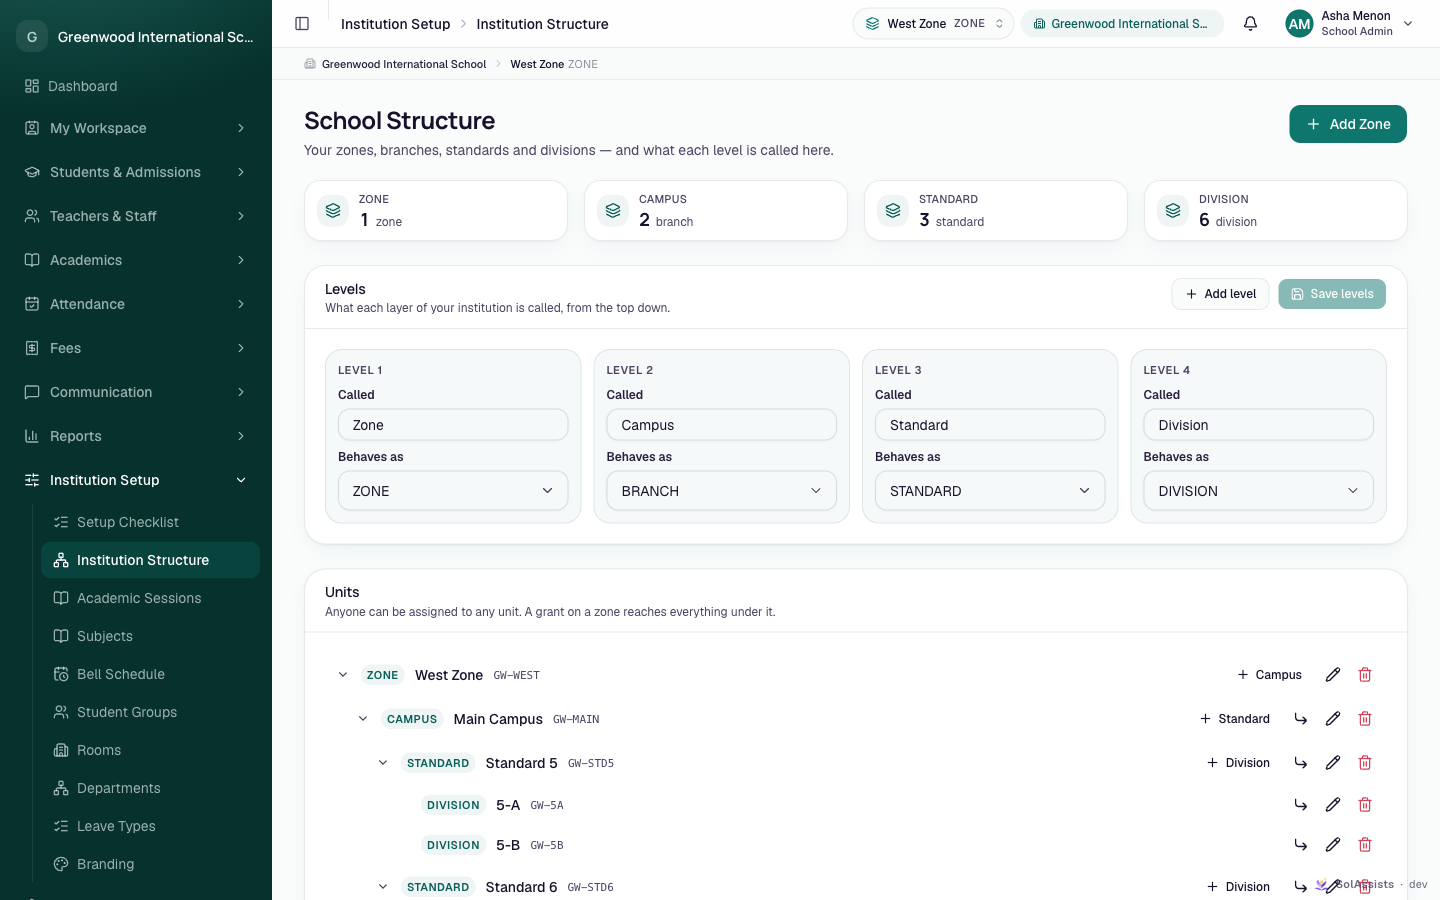
The page heading uses your institution type, for example School Structure. From top to bottom it shows:
- one count per level;
- the Levels card;
- the Units card, with the tree.
Levels
A level has two parts:
- Called: your own name for it, such as "Grade", "Class", "Course" or "Batch". Free text, up to 40 characters.
- Behaves as: what SolAssists treats it as. Choose from ZONE, BRANCH, STANDARD, DIVISION or CUSTOM.
Level 1 is the top of the tree.
| Behaves as | Typical use |
|---|---|
| ZONE | A group of campuses. |
| BRANCH | A campus or branch. You can call it "Campus". |
| STANDARD | A class year, such as "Grade 8" or "Standard 5". |
| DIVISION | A section within a standard, such as "8-A". Students are placed here, and teachers are assigned and timetables built here. |
| CUSTOM | Any other layer your institution needs. It can sit anywhere above a DIVISION level. |
Step by step: change your levels
- On the Levels card, edit Called and Behaves as for each level.
- Click Add level if you need another layer. It is added at the bottom as CUSTOM, named "Level n".
- Fix any red message shown on a level card.
- Click Save levels. You see "Level names saved."
Click Reset to throw away unsaved changes.
Rules for levels
The card checks these as you type:
| Rule | Message on the level card |
|---|---|
| Every level needs a name. | "Give this level a name." |
| Names must be different (capital letters don't count as different). | "Level n is already called "name"." |
| DIVISION must be the bottom level. Nothing can go below it. | "Nothing can sit below the DIVISION level." |
| ZONE, BRANCH, STANDARD and DIVISION must run in that order from the top down. You can leave some out, and CUSTOM can go between them. | "TYPE can't sit below TYPE." |
| Each of those four can be used only once. | "Only one level can behave as TYPE." |
Also:
- You can't change what a level behaves as once units sit at that level. Saving fails with "Units already sit at that level. Move or remove them before changing it." You can always rename a level.
- Levels can't be removed in the app. The card has no remove button. If your institution doesn't use zones, rename the top level (for example to your institution's name) rather than trying to delete it.
- You can have at most six levels on this screen.
- A DIVISION level isn't compulsory. But the timetable, attendance and teaching assignments all work at the bottom level, whatever it is called. See the "Required" warning below.
Schools and coaching institutes
The level names are your own choice, whatever your institution type:
- School: Zone → Branch → Standard → Division. Rename to suit, for example Campus → Grade → Section.
- Coaching institute: for example Centre (BRANCH) → Course (STANDARD) → Batch (DIVISION).
Your institution type also sets some wording elsewhere in the product. For example, a school is called "School", while a coaching centre says Course and Batch and calls its teachers Faculty. The academic screens (timetable, teaching assignments, groups) still say "division" for every institution type. Read "division" as your bottom level.
Units
Step by step: build the tree
- For the top unit, click Add top level name in the page header (for example Add Zone). If the tree is empty, the same button also shows in the middle of the Units card.
- In the dialog New Zone, enter the Name and Code, then click Create. You see "name added."
- On that unit's row, click the + next level name button, for example + Campus. On a phone only the + icon shows. Fill in the dialog, which says "Added under parent."
- Repeat down the tree until every campus and standard has divisions under it. Example: Main Campus → Grade 8 → 8-A.
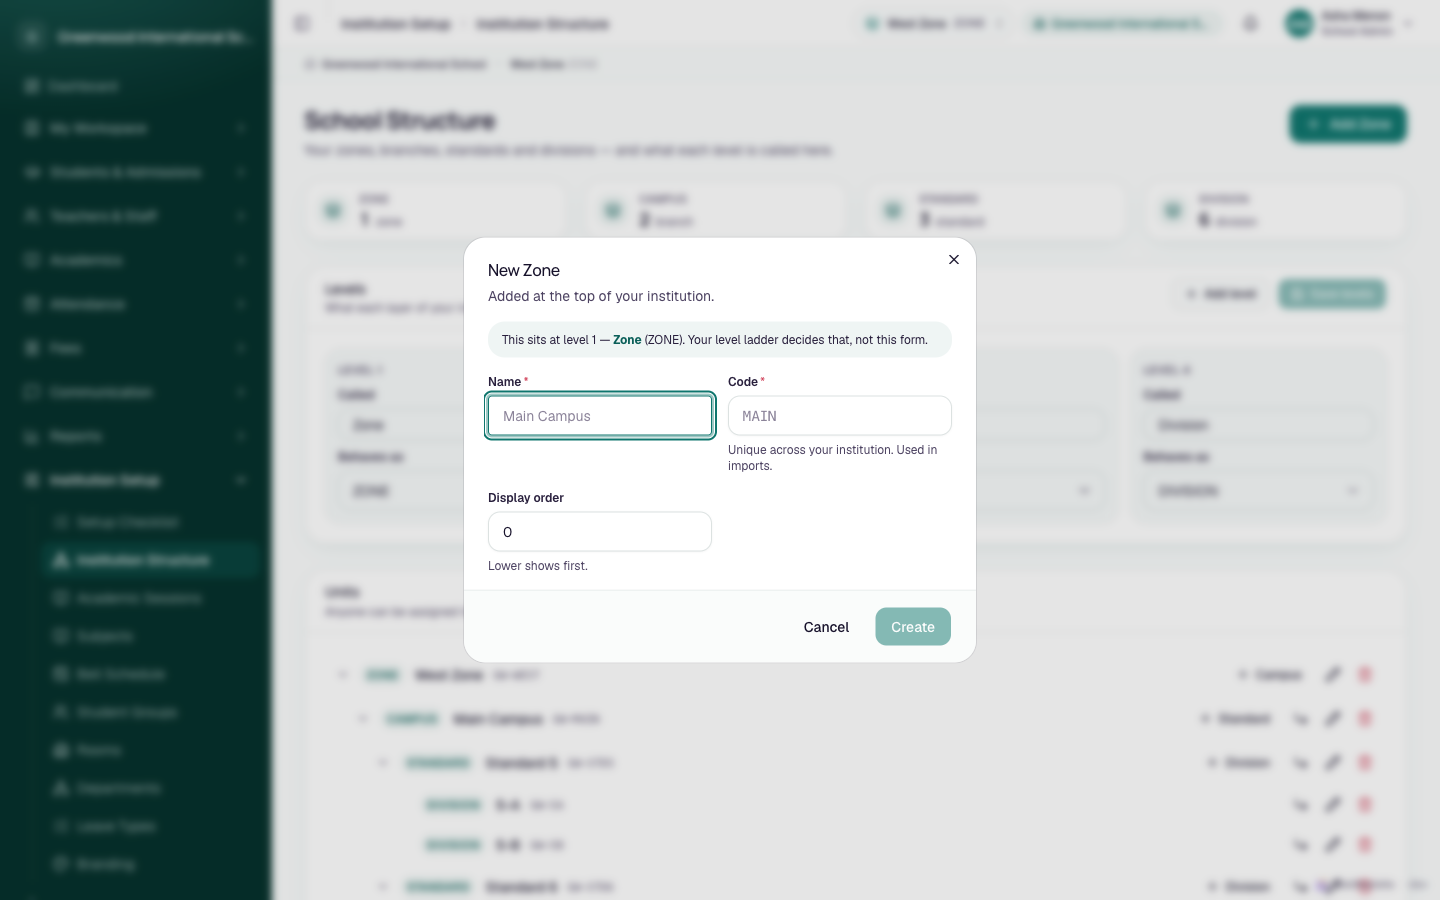
The dialog shows which level the new unit sits at, for example "This sits at level 4 — Division (DIVISION). Your level ladder decides that, not this form." You can't choose the level yourself; it is always one below the parent.
Fields
| Field | Required | What to enter |
|---|---|---|
| Name | Yes | Up to 120 characters, for example 8-A. |
| Code | Yes | Letters become capitals as you type, and spaces or symbols become _. It must start with a letter: GRADE_8_A works, 8A does not. Up to 40 characters, and it must be unique across the whole institution. |
| Display order | No | Lower numbers show first among units under the same parent. Default is 0. |
| Status | Only when editing | Active or Inactive. Inactive "Also deactivates everything below". |
The "Required" warning
If you have units but none at the bottom level, the Units card shows:
Required: no division yet. Timetables, attendance and class posts attach to this level — add one under a standard with + Division.
Until you add units at the bottom level:
- the timetable has no division to show;
- the Division list is empty when you assign teachers;
- students can't be placed in a class.
Codes and bulk import
- Unit codes are what the Division Code column in bulk student import matches. They must match exactly, including capitals.
- This page is the only place codes are shown. They appear in small grey text next to each unit's name. Staff who can't open this page can't look codes up, so share a list of division codes with whoever prepares import files.
- You can change a code with the pencil icon. Spreadsheets that still use the old code will then fail with "No division with code …". Change codes only before anyone starts importing.
Rename, recode or reorder
- Click the pencil icon on the row. The dialog says "Renaming is safe — anyone assigned here keeps their access."
- Change Name, Code or Display order.
- Click Save changes. You see "Unit updated."
There is no drag-and-drop reordering; use Display order.
Deactivate or reactivate
- Click the pencil icon, set Status to Inactive, then click Save changes.
- Everything below that unit is deactivated too. Setting it back to Active reactivates everything below it as well.
People whose access is on an inactive unit, or on anything below it, can no longer sign in to that part of the institution. Actions on it are refused with "That part of the institution is inactive". Inactive units stay in the tree with a status badge.
Move a unit
- Click the move icon (an arrow turning down and right) on the row. Top-level units have no move button.
- In Move name, choose the new parent. Only units one level up are listed.
- Click Move it. You see "name moved."
Everything under the unit moves with it. "Anyone assigned to this unit stays assigned." If there is no other possible parent, the dialog says "There is nowhere else to put this …".
Delete a unit
- Click the bin icon on the row.
- The confirmation Delete name? says it is "Only possible if it has nothing under it and nobody is assigned to it." Click Delete unit.
The delete is refused, and nothing changes, if:
| Reason | Message |
|---|---|
| The unit has units under it | "Move or delete everything under this unit first." |
| Someone's access is on this unit or below it | "People are still assigned here. Reassign them first." |
| Students, teaching assignments, timetable lectures, exams, fee structures or student groups belong to it | "Students, exams, timetable or fees still belong to this unit. Move them before deleting it." |
Once a unit has been used, deactivate it rather than deleting it.
Campus-level administrators
If your access is on one campus or zone rather than the whole institution:
- The Units tree and the counts show only your part of the institution.
- You can add, edit, move and delete units inside your part only.
- You can't add a new top-level unit. The Add top level button may still show, but the save is refused.
Who can do this
- School Admin: everything on this page.
- Users who can view but not change the structure see the page without the add, edit, move or delete buttons. The level fields are greyed out.
- Teachers, students and parents: normally can't open this page.
Common problems
| Symptom | Why | Fix |
|---|---|---|
| "Some fields need fixing." when saving a unit | The code starts with a number or _. | Start the code with a letter. |
| "A record with this value already exists" | Another unit already uses that code. | Use a different code. |
| Save levels is greyed out | Nothing changed, or a level card shows a red message. | Fix the message. |
| "Units already sit at that level. Move or remove them before changing it." | You changed Behaves as on a level that has units. | Only rename it; the type can't change while units exist there. |
| No + button on a row | The unit is at the bottom level, or you lack permission to add. | Nothing below the bottom level is possible. |
| Timetable keeps saying Which division? | A standard or campus is chosen in the top bar. | Choose a division, or add divisions under it. |
| Bulk import says "No division with code …" | The code in the file doesn't match exactly. | Copy the code from this page, including capitals. |