Appearance
Add a student
School AdminHow to add one student, place them in a division, link a parent and attach documents. The example is Rohan Mehta, admission no. DPS-2026-001, joining Grade 8 / 8-A at Demo Public School for the 2026-27 session.
To add many students at once, use Bulk import. For families who apply first, use Admissions.
Before you start
Check these in order. Each item says why it matters and what you see if it is missing.
- The Students module is on, and your role can add and enrol students.
- Why: the page and its buttons depend on it.
- If missing: Students & Admissions → Students is not in your sidebar, or Add student is greyed out with the tooltip "You don't have permission to add students." If you can add students but not enrol them, the record is saved and the Enrol dialog never opens. Ask your administrator. See Permission problems.
- The division exists in the institution structure (for example Grade 8 → 8-A).
- Why: a placement must point at an existing unit.
- If missing: the Division list in the Enrol dialog does not contain 8-A. See Institution structure.
- An academic session is marked current (for example 2026-27).
- Why: enrolment always goes into the current session. You cannot choose another session.
- If missing: the student record is still saved, but Enrol fails with "This institution has no current academic session yet." See Academic sessions.
- The right unit is selected in the top bar.
- Why: the Division list only offers units inside your access. If a unit is selected in the top bar when you add the student, the Enrol dialog pre-selects it.
- Tip: select 8-A in the working-scope picker before you start, so 8-A is pre-selected.
- You know the admission number. SolAssists does not generate admission numbers. Use your institution's own number, and make sure no other student already has it.
- (Optional, for later) A parent's email address. A parent can only be given a sign-in if their guardian record has an email. See Parent onboarding.
Where to find it
Students & Admissions → Students, then click Add student (top right). On an empty list you can also click Add the first student.
Step 1: Create the student record
- From the sidebar choose Students & Admissions → Students.
- Click Add student. The Add a student dialog opens.
- Enter First name:
Rohan. - Enter Last name:
Mehta. - Enter Admission no.:
DPS-2026-001. - Fill in any optional fields you have (see the table below). Leave the rest blank. Blank means "not recorded", and you can add details later with Edit.
- Click Add student. The button stays greyed out until First name and Admission no. are both filled in.
- A message confirms "Rohan added." If your role can enrol students, the Enrol Rohan dialog opens next. Continue with Step 2.
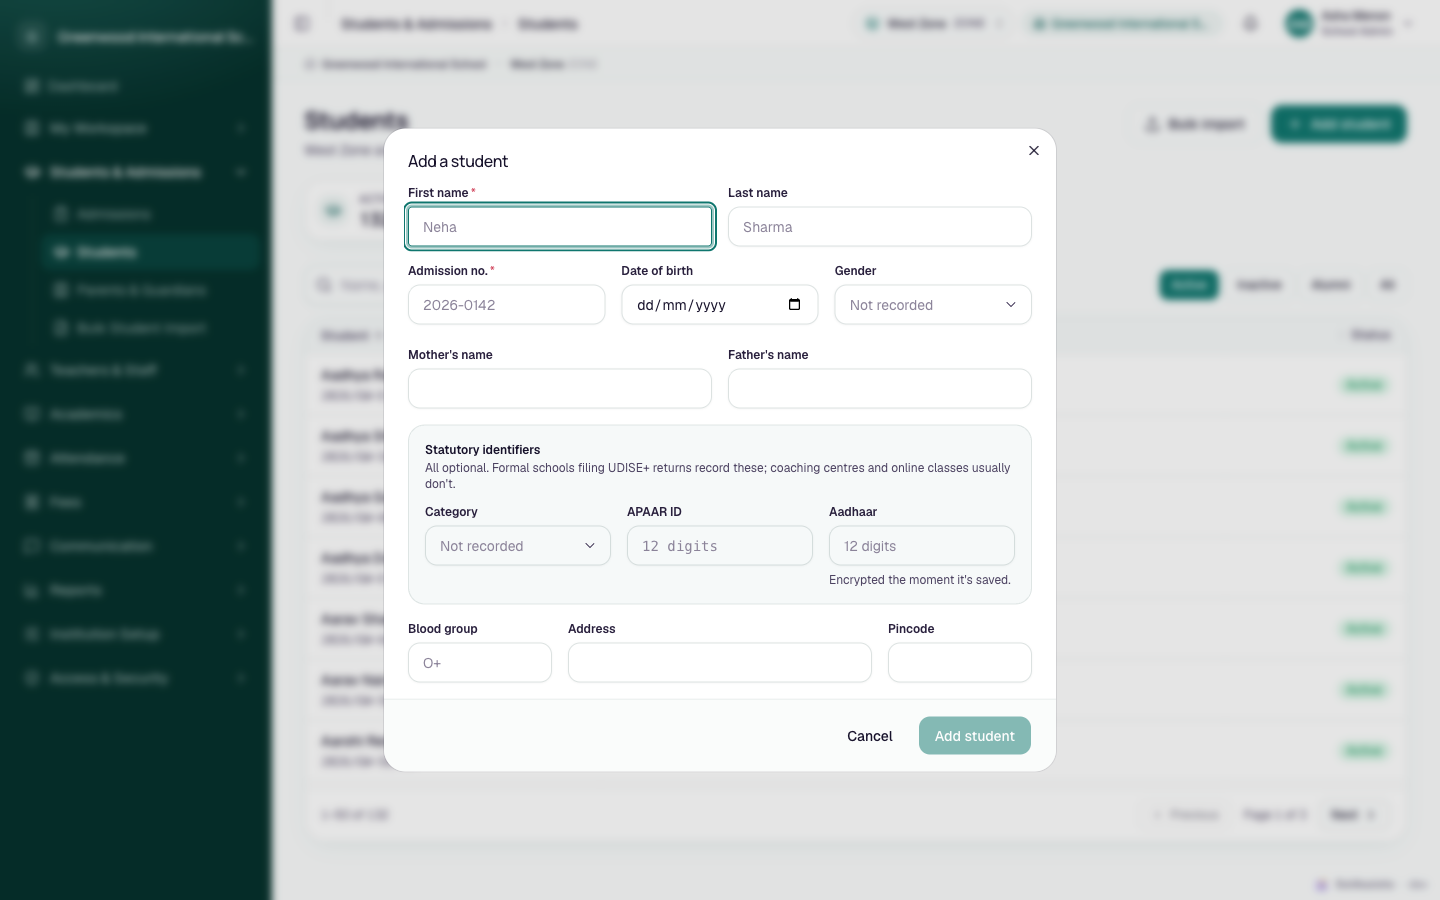
Fields
| Field | Required | What to enter | Rules |
|---|---|---|---|
| First name | Yes | The student's first name (placeholder "Neha") | Up to 80 characters |
| Last name | No | Surname (placeholder "Sharma") | Up to 80 characters |
| Admission no. | Yes | Your institution's admission number (placeholder "2026-0142") | Up to 40 characters, any format. Must be unique in the institution. |
| Date of birth | No | Pick from the date picker | A valid date. The app does not check whether it is in the future. |
| Gender | No | Female, Male or Other. Leave on "Not recorded" if unknown. | — |
| Mother's name | No | Full name | Up to 80 characters |
| Father's name | No | Full name | Up to 80 characters |
| Statutory identifiers section | "All optional. Formal schools filing UDISE+ returns record these; coaching centres and online classes usually don't." | ||
| Category | No | General, SC, ST, OBC or EWS. Default "Not recorded". | — |
| APAAR ID | No | 12 digits (placeholder "12 digits"). Non-digits are removed as you type. | Exactly 12 digits. Must be unique in the institution. |
| Aadhaar | No | 12 digits. Hint: "Encrypted the moment it's saved." | Exactly 12 digits (spaces are ignored). Only the last four digits are shown afterwards. Must not belong to another student. |
| Blood group | No | For example O+ | Up to 8 characters |
| Address | No | House, street, area | Up to 200 characters |
| Pincode | No | Postal code | Up to 12 characters |
Not on this form
- Division and roll number are set in Step 2, not here.
- Town or city, ABC ID and photo cannot be entered by staff. The student profile shows an ABC ID row, but no screen fills it. A student can add their own photo and town from My Profile once they have a sign-in (see Step 5).
Validation messages
| Message | Where | Cause and fix |
|---|---|---|
| Add student stays greyed out | Dialog button | First name or Admission no. is empty. |
| "APAAR is 12 digits" | Under APAAR ID | Enter exactly 12 digits, or clear the field. |
| "Aadhaar is 12 digits" | Under Aadhaar | Enter exactly 12 digits, or clear the field. |
| "That Aadhaar is already on {name} ({admission no.})" | Red message in the dialog | Another student already has this Aadhaar. Check for a duplicate record before saving. |
| "A record with this value already exists" | Red message in the dialog | The Admission no. or APAAR ID is already used by another student. The message does not say which one. Search the student list for the admission number first. |
| "Couldn't save the student." | Red message in the dialog | Something else went wrong. Try again. If it keeps happening, contact support. |
Step 2: Place the student in a division (Enrol)
The Enrol Rohan dialog opens automatically after Step 1. Its description reads: "Placement is per academic year — promoting later adds a new one rather than editing this, so past records stay attached to the division they happened in."
- In Division (required), choose 8-A. If you selected 8-A in the top bar, it is already chosen. The hint says "Only units inside your own access appear here."
- Optionally enter a Roll number, for example
17. - Click Enrol. A message confirms "Enrolled."
The student list now shows Rohan with 8-A · Roll 17 instead of Not enrolled this year.
If you closed the dialog, or your role could not enrol when you added the student, open the student's profile later and click Enrol in the Enrolment history section.
| Field | Required | What to enter |
|---|---|---|
| Division | Yes | The division the student sits in this session. The list also shows each unit's level, such as Division or Standard. |
| Roll number | No | Up to 20 characters. It can be added later. |
Choose a division, not a standard or branch
The Division list includes every unit you can access at every level: zones, branches, standards and divisions. The app accepts any of them. A student placed on Grade 8 instead of 8-A does not appear on the 8-A register or timetable. Check the level label next to each option before you click Enrol.
Enrolling again replaces the current placement
If the student already has a placement in the current session, Enrol silently replaces the division and roll number. To move a student to another division, use Transfer instead: it checks roll numbers and records where the student came from. See Placement and promotion.
Enrol problems:
| Message | Cause | Fix |
|---|---|---|
| "This institution has no current academic session yet." | No session is marked current | An administrator marks a session current in Academic sessions, then you click Enrol again on the student's profile. |
| "That class is outside the ones you work with." | The unit is outside your access | Choose a unit inside your scope, or ask an administrator. |
| "Couldn't enrol this student." | Other error | Try again. |
Enrol does not check whether the roll number is already taken in that division. Check the class list first.
Step 3: Link a parent or guardian
A parent can only see a child's attendance, results and fees after being linked to that child.
- On Rohan's profile, find the Guardians section on the right. It reads "A parent linked here sees this child in their own app."
- Click Link.
- Search for the parent, for example
Sunita. If she is already on file (for example as a sibling's mother), select her. If not, click This person isn't on file and enter First nameSunita, Last nameMehta, Phone and Email. - Choose the Relationship (Mother), and tick Primary contact if she should be called first.
- Click Link (or Add and link). A message confirms "Guardian linked."
Full details: Link parents to children. To give Sunita a sign-in: Parent onboarding.
Step 4: Photo and documents
Documents (birth certificate, transfer certificate and so on):
- On the student's profile, scroll to Documents ("Certificates, proofs and report cards. The ones that lapse are flagged.").
- Click Add. The Add a document dialog opens ("Stored privately. Links to it expire after a few minutes.").
- Choose the Kind: Birth certificate, Identity proof, Address proof, Transfer certificate (the default), Medical, Report card, Photograph or Other.
- Optionally enter a Label ("Optional. Helps when somebody has several of the same kind.") and Expires on ("Leave blank if it does not lapse.").
- Choose the file and click Attach. The button shows "Uploading N%" while the file uploads. A message confirms "Added to their file."
A student with no documents shows Nothing on file. To remove a document, click its remove icon and confirm Remove this document?. The file is deleted too.
Photo: staff cannot upload a student's profile photo. A student with a sign-in can upload their own under My Profile → What you can change → Your photo. You can store a photograph as a document with the kind Photograph, but that does not become the profile photo.
Step 5: A sign-in for the student
Not available yet
You cannot give a student a sign-in from SolAssists today. No screen or setting links a student record to a login account. Creating an account with the Student role under User Accounts & Access does not link it to the student's record. That account sees no timetable, attendance or results of its own, and My Profile shows "Nothing else on file".
Student sign-ins exist only in pre-loaded demo data. Contact SOL support if your institution needs student sign-ins. Parents can be given sign-ins; see Parent onboarding.
What happens next
- Rohan appears in Students with his division and roll number, and on the 8-A class list, register and timetable for 2026-27.
- Teachers assigned to teach 8-A in the current session can now see him.
- The change is recorded in the audit trail and under Record history on his profile.
- A linked parent with a sign-in sees Rohan under Your children on their dashboard.
- Nobody is notified automatically when a student is added.
Who can do this
- School Admin: everything on this page.
- Teacher: can view students in the divisions they teach, but cannot add, enrol or link.
- Custom roles: adding a student needs permission to create students. Enrolling needs permission to update students. Linking a guardian needs permission to link guardians. Documents need permission to update students.
Common problems
| Symptom | Why | Fix |
|---|---|---|
| The student shows Not enrolled this year | Step 2 was skipped, the Enrol dialog was closed, or your role cannot enrol | Open the profile and click Enrol. |
| The student doesn't appear in the list after saving | The top-bar unit, or the Active filter, hides them | Select a higher unit in the top bar, or click All. |
| The student is missing from the 8-A register | They were placed on a standard or branch, not the division | Use Transfer to move them to 8-A. |
| "A record with this value already exists" | The admission number or APAAR ID is already used | Search the list for the number. Fix the existing record or use a different number. |
| The Division list is empty or doesn't show 8-A | No divisions exist, or 8-A is outside your access | See Institution structure and ask an administrator to check your access. |