Appearance
Admissions
School AdminAdmissions records enquiries and applications, tracks the decision on each one and turns an approved applicant into an enrolled student in a single step.
Before you start
- The Admissions module is switched on and your role has admissions permissions. Otherwise Students & Admissions → Admissions is missing from the sidebar.
- A current academic session. Every application belongs to the current session. Without one, Record fails with "This institution has no current academic session yet." See Academic sessions.
- Divisions in the institution structure, so you can offer a seat. See Institution structure.
- To enrol an applicant you also need permission to add students.
Where to find it
Students & Admissions → Admissions opens the page headed Admissions. The description reads "Applications for {unit} and everything under it." (or "Enquiries, through to a seat in a division." when no unit is selected).
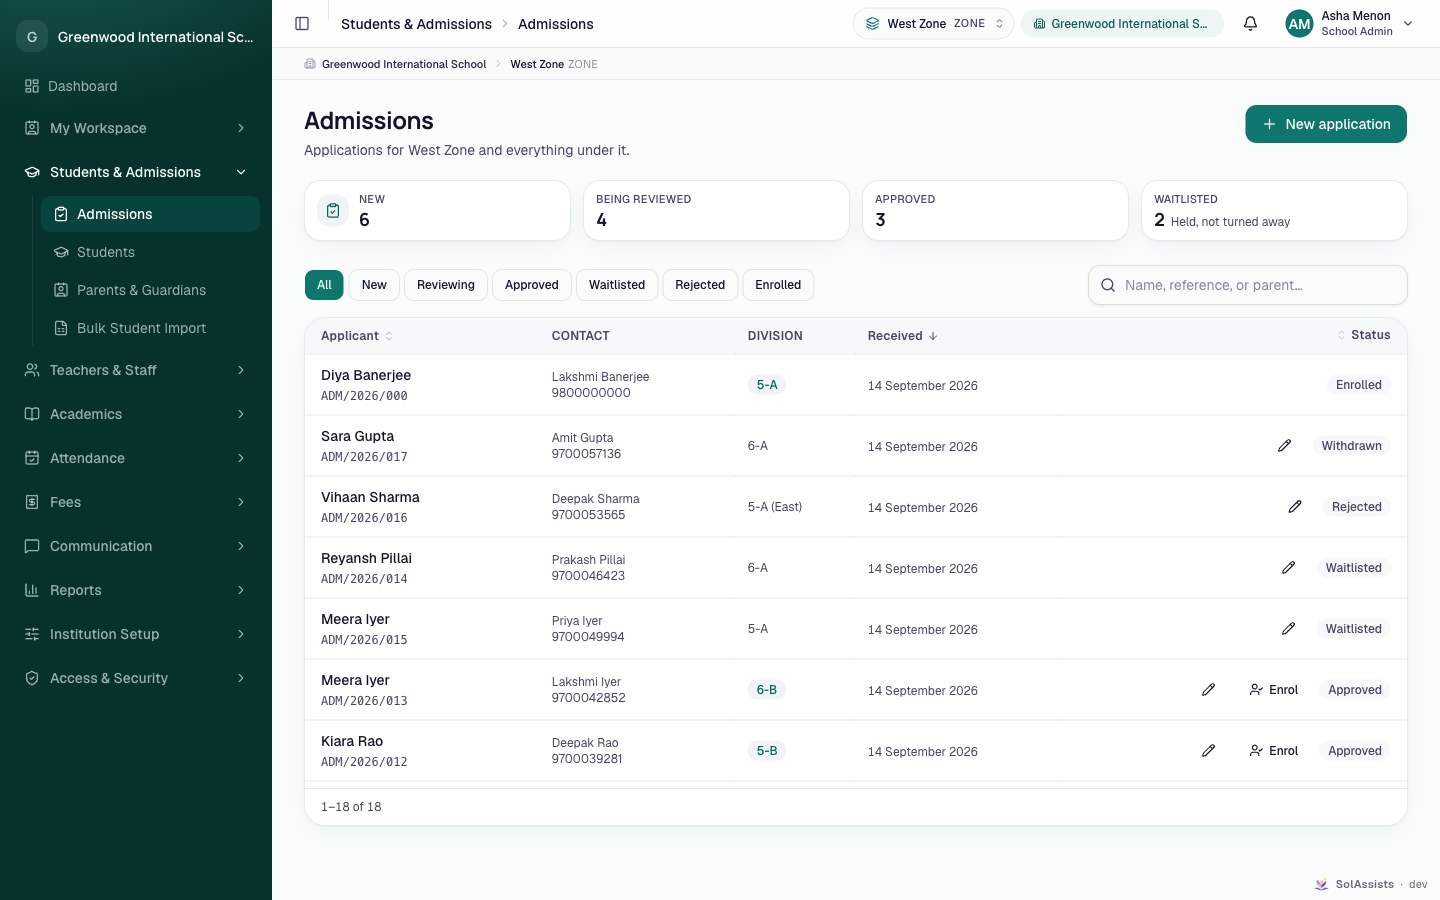
- Count cards for the current session: New, Being reviewed, Approved and Waitlisted ("Held, not turned away").
- Stage filters: All, New, Reviewing, Approved, Waitlisted, Rejected, Enrolled. There is no Withdrawn filter; withdrawn applications appear only under All.
- Search: "Name, reference, or parent…"
- Columns:
- Applicant: name and application number
- Contact: parent name and phone
- Division: the offered division, plus "asked for X" if it differs from the request
- Received: date
- Status: a pencil to edit, an Enrol button when Approved, and the status badge
- Click a row to open the decision dialog.
Empty list: No applications yet ("Record an enquiry as soon as it comes in — it takes a name and nothing else."). With a filter or search: Nothing matches that.
Step 1: Record a new application
- Click New application. The dialog says "A name is enough to start. Everything else can be filled in later."
- Fill in the fields below. Only First name is required.
- Click Record. A message confirms "Application recorded." The application gets an application number and the status Submitted (counted as New).
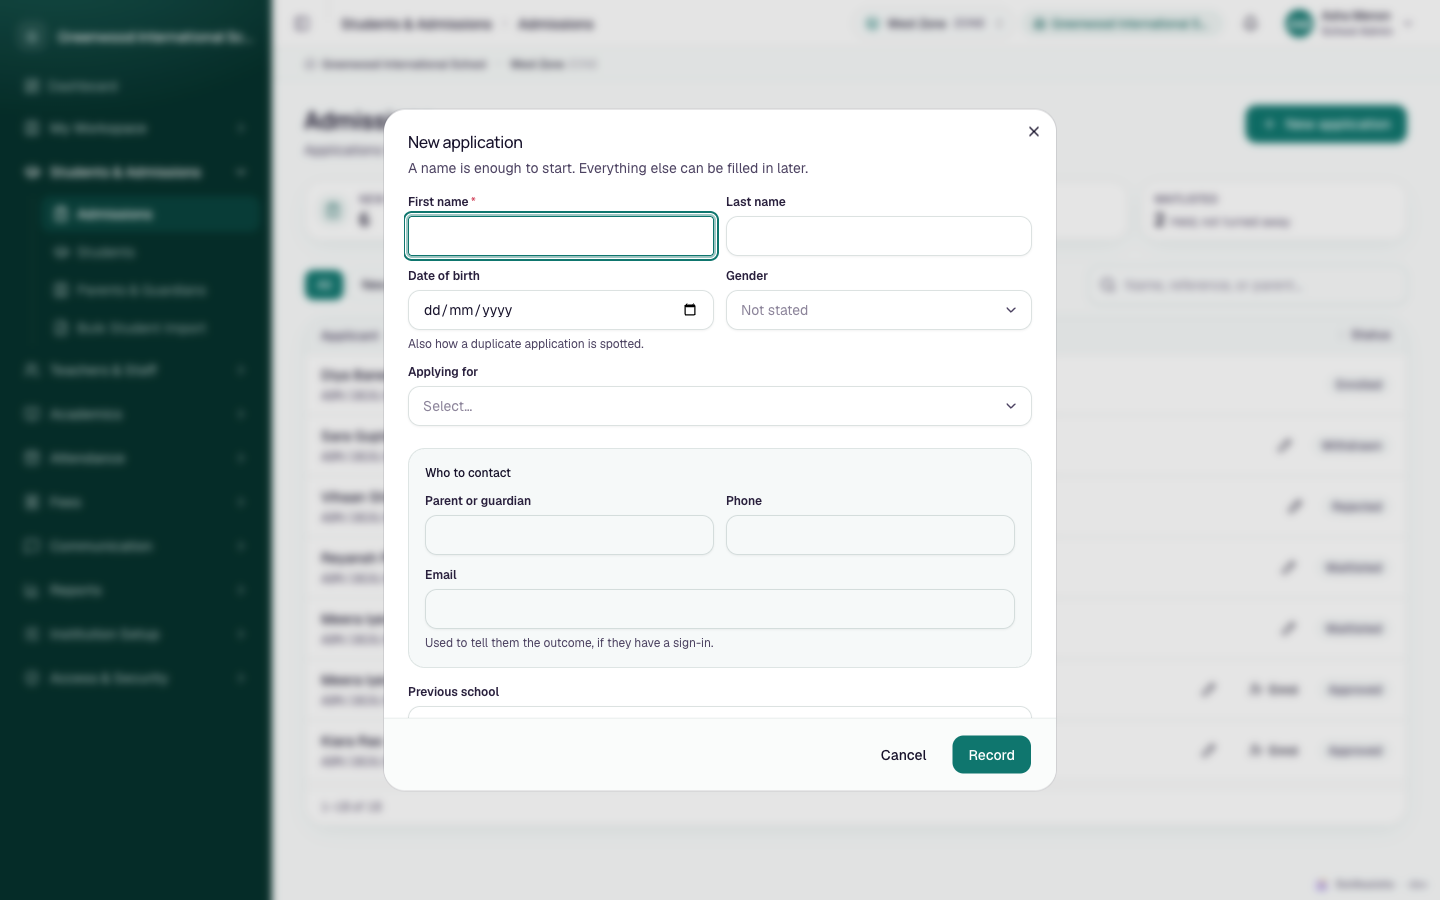
| Field | Required | What to enter |
|---|---|---|
| First name | Yes | Applicant's first name, e.g. Rohan |
| Last name | No | e.g. Mehta |
| Date of birth | No | Hint: "Also how a duplicate application is spotted." |
| Gender | No | Female / Male / Other (default "Not stated") |
| Applying for | No | The unit requested, e.g. Grade 8, or "Not decided yet". Any level can be chosen. If left empty, the application is filed under your working unit. |
| Who to contact | ||
| Parent or guardian | No | Full name, e.g. Sunita Mehta |
| Phone | No | |
| No | Hint: "Used to tell them the outcome, if they have a sign-in." | |
| Previous school | No | |
| Notes | No | Free text |
The application form has no fields for APAAR ID, category or parents' names. Add those on the student profile after enrolment.
Duplicate warning
If an open application already exists for a child with the same name and date of birth in the same session, a yellow warning appears: "An open application for {name} with the same date of birth already exists ({application no.}). Record this one only if it is a different child."
- If it is the same child, close the dialog and use the existing application.
- If it is a different child with the same name, click Record anyway.
Duplicates are only detected when a date of birth is entered.
Editing an application
Click the pencil in the Status column to open Edit application ("Correct the details on file."). Change the details and click Save; the message is "Application updated." Enrolled applications cannot be edited. Rejected and withdrawn ones show the pencil, but saving is refused with "This application is rejected and can no longer be edited" (or "withdrawn").
Step 2: Review and decide
- Click the application's row. The dialog shows the applicant's name, "{application no.} · received {date}", the status, the contact and the Last decision note if there is one.
- Optionally choose Offer a division (hint: "Often not the one applied for — the office decides which division has room."), for example 8-A.
- Under Decision, click one of the buttons available for the current status (see below).
- For Waitlist, Reject and Family withdrew, fill in Why? (required). The hint reads "This is what the family will be told, and what answers the question six months later."
- Click Save. A message confirms "Application updated."
If your role cannot act, the dialog says "You can see this application but not act on it. Ask your administrator for the admissions permissions."
Statuses and allowed decisions
| Button | New status (badge) | Allowed from | Reason required |
|---|---|---|---|
| Start reviewing | Under review | Submitted, Waitlisted | No |
| Approve | Approved | Submitted, Under review, Waitlisted | No |
| Waitlist | Waitlisted | Submitted, Under review | Yes |
| Reject | Rejected | Submitted, Under review, Waitlisted | Yes |
| Family withdrew | Withdrawn | Submitted, Under review, Approved, Waitlisted | Yes |
| Enrol this applicant | Enrolled | Approved only | — |
Rejected, Withdrawn and Enrolled are final: no decision buttons are offered for them, and no division can be offered.
Decision messages:
| Message | Cause |
|---|---|
| "Say why — this is what the family will be told" | Why? was left empty for Waitlist, Reject or Family withdrew |
| "An application that is {status} cannot be {decision}" | Someone else changed the status first. Close the dialog and reopen it. |
| "This application is rejected" / "withdrawn" / "enrolled" | You tried to offer a division on a closed application |
Telling the family: when an application is approved, waitlisted or rejected, SolAssists sends an in-app notification only if a parent with an active sign-in and the same email address already exists. Otherwise nobody is told automatically, so contact the family yourself.
Step 3: Enrol the approved applicant
- Open the approved application and click Enrol this applicant ("Approved. Enrolling creates the student, their placement and the guardian record."), or click Enrol in its row.
- The Enrol {first name} dialog opens: "Creates the student, their placement for this year, and the guardian named on the application."
- Enter the Admission number (required), e.g.
DPS-2026-001. The hint reads "The institution's own reference. It must not already be in use." - Check Division. It is pre-filled with the offered division, or with the requested one. Make sure it is a division such as 8-A, not a standard.
- Optionally enter a Roll number ("Optional — it can be set when the register is drawn up.").
- Click Enrol. A message confirms "{first name} is now on the roll." The status becomes Enrolled.
What gets created, all at once:
- A student record with the name, date of birth and gender from the application.
- A placement in the chosen division, in the session the application was recorded in.
- If a parent name was entered: a new guardian record with that name, phone and email, linked as Guardian and marked Primary.
No sign-in is created for the student or the parent.
Enrol messages:
| Message | Fix |
|---|---|
| "An admission number is required." | Enter the admission number. |
| "Admission number {X} is already in use" | Use a different number, or check whether the child is already on the roll. |
| "Choose the division this student joins" | Choose a division. |
| "Only an approved application can be enrolled" | Approve it first. |
| "This applicant was already enrolled." | Shown when enrolment had already completed, for example after a double click. Nothing is duplicated. |
Check after enrolling
- Guardian duplicates: enrolling always creates a new guardian, even when that parent is already on file for a sibling. The whole parent name is stored as the first name, and the relationship is set to "Guardian". Afterwards, open the student's profile, unlink the new guardian and link the existing record (see Link parents to children), or edit the new record.
- Roll numbers are not checked for clashes.
- Session: the placement goes into the session the application was recorded in. If the current session has changed since then, check Enrolment history on the student's profile.
- Add APAAR ID, Category and the parents' names with Edit on the profile.
Who can do this
| Step | Needed | School Admin | Teacher |
|---|---|---|---|
| View applications | Read admissions | Yes | No |
| New application | Create applications ("You don't have permission to record applications." otherwise) | Yes | No |
| Edit | Update applications | Yes | No |
| Decision buttons | Approve applications | Yes | No |
| Offer a division | Allocate divisions | Yes | No |
| Enrol | Approve applications and add students | Yes | No |
A custom role that can add students but not approve applications still sees the Enrol button, but enrolling is refused with "You don't have permission for that."
Staff scoped to a branch see applications for, or offered to, units in their branch. Teachers, students and parents cannot see applications.